LEARN EVERYDAY.
Our coaches coach each other to ensure we are all continually learning.
What will YOU learn this week?
LEARN EVERYDAY.
Our coaches coach each other to ensure we are all continually learning.
What will YOU learn this week?
🎓 📝 LAB REPORT-365 📝 🎓
#62 Running: One of the most misunderstood skills in human movement.

In my experience 99% of people, (recreational exerciser through strength coaches) have little or no understanding of running mechanics. The running community tends to prioritize volume (km’s) over skill and form.
Part Two: Mechanics / Posture
A lot of traditional running mechanics theory tell us to push off the ground, long stride, knee lift, land on the foot (heel) in front of the body, transfer weight through the foot and push off again. This is also the natural running technique for much of the population due to mimicking others they subconscious see daily and due to imbalances from lack of correct strength training (will get into this later on).
With efficiency, performance and lower risk of injury in mind we need to use the science (part one) to our advantage. Gravity needs to be utilized through the correct amount of forward lean, to create momentum through acceleration and maximize torque and the use of muscle elasticity vs muscle contraction. Therefore we are using nature’s laws and physics to run rather then forcing ourselves in a less efficient way against them.
Posture:
1: Midline / Trunk Stabilization, we use a number of indicators for correct posture before running and lifting.
Feet: are they straight and “screwed” into the ground (creating torque).
Hips: Slight anterior tilt, glutes contracted and pelvic floor contraction.
Rib cage: pulled down (not into trunk flexion though)
2: Head Position in crucial to keep posture and breathing maintained during running.
Head should sit directly over shoulders and centered over the mid line. Far to many people will “reach” with their chin to try and move faster / maintain speed once fatigue hits, which is a technical flaw.
3. Arm position, is critical for efficient movement balance once neutral / running posture can be achieved.
Arms should sit at 90 degrees by your side with a lightly clenched fist, thumb on top of index finger. This will allow for energy to be maximized during movement rather than “leaking” energy with flailing arm movements.
In part three we will look at translation (forward lean), pulling the foot, landing and transitioning
Look for our:
Seminars & Blogs
OR
email: coach@aplabs.com.au
Facebook message
Instagram: ascension_performance_labs
Cam Burnside – B.App.Sci (HONS)
🎓 📝 LAB REPORT-365 📝 🎓
#59 Box Squats – The How and Why
So what is a box squat? You might have seen this variation of squat in your local gym or facility – a squat where the athlete or client descends until their glutes and hips reach a stable surface (generally a bench, jerk block or plyometric box), at which point they may pause depending on the variation, before ascending and completing the movement. Simple enough, right? While it may appear that is all there is to it, there are important factors to consider when both programming a box squat, and actually completing the movement.
Generally there are 2 types of box squats used in our programming at APL:
Squat to Box
This is simply a traditional squat, with a box (again, just a bench / jerk block / plyometric box) set up behind the athlete or client in a position that they can comfortably squat to at the bottom of the movement. The main use of this variation is to simply provide the athlete or client with a depth marker, so that they know where they should be squatting to. This is particularly handy when depth consistency is an issue (their depth of squat varies significantly, usually shifting between below and above parallel), or when there is a confidence issue reaching the required depth. Having a physical surface that they can squat to not only allows for the athlete or client to hit the desired depth consistently on every rep, it also provides them with a ‘safety net’ of sorts.
Some important cues to remember when coaching a squat to box:
1. The athlete or client should not ‘sit’ on the box at the bottom of the movement – instead they should simply stop when they reach the bench / block / box, ensuring they retain tension and continue to hold the load, before ascending and completing the squat movement as per normal.
2. The height of the bench / block / box should be appropriate for the athlete or client. For the majority of people with no mobility or injury restrictions, you should be aiming for below parallel to maximize the benefits of the movement. Have the athlete or client squat to the surface without any load (i.e. bodyweight squat) prior to beginning any reps to ensure the height is correct. The same obviously applies if you are specifically restricting depth due to a mobility or injury issue.
Box Squat
This is the variation we more commonly use at APL, and is one of the core movements we program for a lot of our athletes and clients. Made popular in particular by Westside Barbell, this variation of the squat aims to specifically load the athlete or client’s posterior chain (think glutes and hamstrings in particular) and eliminate or minimize any forward knee slide and in turn anterior chain loading. It retains the benefits of the squat to box – consistent depth in squatting, as well as incorporating a ‘safety net’ for less confident athletes or clients – while also addressing those people with posterior chain weak-points.
Some important cues to remember when box squat:
1. Set the athlete or client up in a wider than normal squat stance. A stance width similar to your sumo deadlift set-up is generally a good guide, but adjust accordingly based on hip mobility.
2. Ensure the athlete or client follows the normal squat cue to generate external rotation through their hips (screwing their feet into the ground), bracing through their core, and breathing in prior to beginning the movement to increase inter-abdominal pressure and tightness.
3. Ensure the athlete or client sits their hips back as they begin descending, aiming to maintain vertical shins throughout the movement. You will need to allow for the torso to shift into a slightly more forward position than normal, however ensure this is a smooth transition – the hips should continue to descend as the torso moves forward, so that the athlete or client does not end up in a good morning position.
4. Similar to the squat to box, ensure the athlete or client does not ‘sit’ at the bottom of the movement – a pause is ideal, however they should retain full tension and continue to hold the load themselves, using the box simply as a physical cue as to when to stop the descent.
So in a nutshell – if you are simply looking to help an athlete or client struggling with squat depth or confidence, a squat to box might be what you are after. If you are looking to address weak-points in someone’s posterior chain strength (particularly glutes and hamstrings), while also ensuring consistent squat depth, box squats would be more appropriate.
– Callum
🎓 📝 LAB REPORT-365 📝 🎓
#55 1RM Testing – When and how should it be used?
With the rise in popularity of ‘functional’ training – defined as programming based upon core compound lifts such as Squats, Deadlifts and Bench – has come an increase in the use of 1RM Testing amongst trainers, coaches, and even athletes or general gym goers who train themselves. While 1RM Testing is a valuable tool for measuring progress and developing a baseline for certain programs, there are a few key things to consider before throwing yourself or a client under a bar and pushing them to a max single repetition.
Who is it you are testing, and what are their goals?
Probably the most important thing to consider when testing is your client themselves:
* What level of experience do they have?
As an example, a novice client who has limited or no strength training experience is not an ideal candidate for 1RM Testing; they will (in most cases) not have the required skill to move well under load, let alone significant load, and will often struggle to execute the desired movement patterns with just an empty bar. These clients will require their initial programming to be focused on skill acquisition and developing a base level of strength before any sort of official testing is carried out. Once they are comfortable in the movement and can carry out the programmed number of reps in a correct and consistent manner, a 3RM – 5RM Test might be carried out; if a 1RM is required for programming purposes, it can be extrapolated from this 3RM – 5RM Test.
On the other side of the coin, an athlete whose training age is significantly advanced and can comfortably execute the desired movement will obviously not need to hold off on testing in order to develop their skill acquisition or base level of strength. You will obviously still want to screen their movement to ensure there are no issues they themselves might not be aware of, however providing they move well there is nothing stopping you from carrying out a 1RM Test on Day 1 if time permits.
* What are their goals, and where do you intend on going with their training?
Be mindful of your client’s goals. For example, someone who is only interested in general strength development will of course have very different programing requirements than someone whose training goal is to increase their squat from 1.5X Bodyweight to 2X Bodyweight, as well as different testing requirements. For a client who is just interested in general strength development, there may never be a need to carry out a 1RM Test. In this case, a 3RM – 5RM Test would be more than adequate to determine progress / assist in programming (if your programming requires a 1RM figure to determine submaximal loads). Such a client may also not be comfortable performing a 1RM Test, with the thought of carrying
out a single repetition at significant load at 100% of their capacity too intimidating.
For a client whose specific goal is to increase their strength and numbers in a particular lift (or all 3 of the core lifts), 1RM Testing is in most cases a necessity to determine true progress and current levels of strength. 3RM – 5RM Testing still has its place – for example, in non-standard lifts in which the client might not have as much experience – however 1RM Testing will need to be carried out to determine a baseline initially, and at appropriate intervals throughout their training.
Frequency of Testing
For those clients who enjoy the process of 1RM Testing, and derive motivation and satisfaction from seeing their numbers go up, it can be easy to get carried away and conduct 1RM Testing too frequently. While initially you may see your numbers continue to rise even if you are testing weekly (particularly if the client’s training age is not advanced), eventually your strength and numbers will plateau. Sufficient time must be left in-between testing to allow for the programming and training to work, and to prevent your body from adapting to testing the same lifts. For a regular client, we generally will conduct 1RM Testing every 12 – 18 weeks. There are of course considerations to factor into frequency of 1RM Testing; if it is for an athlete (either in-season or prepping for a competition) you will need to alter this based on their sporting commitments. For someone with an injury – be it minor or major – you will need to ensure appropriate rehabilitation has occurred and they are physically ready to be put under the strain and stress of testing.
An important point to consider is that 1RM Testing is not the only way to measure progress. As mentioned above, some clients find a great level of satisfaction and motivation in seeing their lifts go up and may start to lose focus if there is no benchmarking of their strength whatsoever for 12 – 18 weeks. AMRAPs (as many reps as possible), high volume sets (10 – 20 reps) or reps for time are all great ways of testing strength, and can be repeated to measure progress. The advantage they have outside of testing in a different setting to 1RM Testing to help avoid adaptation, is that they are typically carried out a relatively low loads and are therefore more easily recovered from.
Knowing when and when not to push the limits
This point relates to the 1RM Test itself, and knowing when to push your client harder or draw the line and call it for the day. As with everything we do as Coaches and Trainers, our clients’ wellbeing should be our top priority. A 1RM Test in a typical gym environment should not be pushed to the point where there is complete form breakdown, just for the sake of a gym PR. In the majority of cases, your clients will either be general gym goers for whom strength training is just a hobby, or athletes who are carrying out strength training to improve their sports performance. In either of these scenarios, pushing a client to the point where their form
has been completely thrown out the window simply to achieve a lift that is heavier than their last does not benefit them at all. A complete form breakdown means in most cases that the correct muscle groups are not being recruited, which in turn means they are not overloading and strengthening the desired muscles and more importantly are at risk of injuring themselves. That is not to say that your client should not be pushed – in a true 1RM setting they should feel slightly out of their comfort zone, and feel as though they are giving 100%. Some form breakdown is to be excepted and is of course acceptable. At the very least, your client should be initiating the movement in the correct form and only losing technique after the movement has commenced. If significant form breakdown occurs at the very beginning of the lift, it is usually a good time to wrap up the testing.
Consistency in Testing
The final point relates to ensuring that each test you do is consistent, so that the various results from testing are comparable and accurately represent either a true increase or decrease in strength. For instance, if you 1RM Test a high-bar squat in Olympic lifting shoes at the start of the program and wish to assess how much your squatting strength has improved, you need to re-test using a high-bar setup in (preferably the same) Olympic lifting shoes. For a more casual client, you should at the very least re-test the same variation of the lift (high-bar to high-bar, box squat to box squat etc.). Other external factors should also be controlled / managed as best as possible, to ensure consistent testing. This includes sleep, time of testing, training volume leading up to testing, and nutrition.
There are of course other things to consider when testing, and the more advanced your client and their training program, the more thought should be given to the process. The above information however should provide a good framework for testing the majority of clients.
– Callum
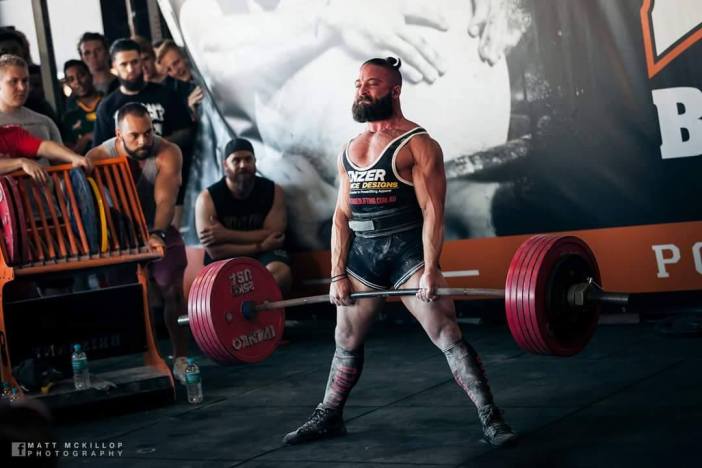
Photo Credit: Matt McKillop Photography
🎓 📝 LAB REPORT-365 📝 🎓
#53 Fatigue Management
What is fatigue? In regards to training, fatigue is the state in which our performance is negatively impacted by stressors placed upon us. Fatigue can of course be caused by overtraining, however external factors such as lack of sleep, poor nutrition or stress can also play a significant role.
For those of us who have maintained a training cycle or program at a high level of intensity for a prolonged period of time, we will no doubt have suffered at some stage from fatigue. As an athlete, how do we recognize this occurrence of fatigue and appropriately manage it?
While there are numerous indicators of fatigue, here are some of the more basic and easily recognizable ones:
• Decreased performance (e.g. velocity or strength);
• Decreased work capacity;
• Reduced training motivation;
• Reduced appetite;
• Mood swings / disturbances; and
• Illness and injuries.
So what causes these symptoms and in turn fatigue in our training? Almost all the major external factors are within our control, or at the very least are able to be influenced by a disciplined athlete.
1. Poor or inadequate nutrition – Nutrition itself is a complex topic and specific nutritional advice (incl. meal plans) should only be provided by individuals with the appropriate qualifications and understanding of the athlete and their relevant sport demands. That being said, some basic nutritional facts that all athletes should acknowledge or adhere to include:
a. Fuel your body – If calories expended outweigh caloric intake, you will be in a calorie deficit. For most people, this will lead to underperformance and impact on fatigue. Your calories expended will be determined by intensity, length and frequency of training, as well as other activities throughout your day. See http://www.ausport.gov.au/ais/nutrition/factsheets/basics for some general guidelines.
b. Fuel your body with good food – Whole, nutritious foods such as fruit, vegetables, lean meats, grains and some dairy will not only benefit your health, but provide more effective, sustained levels of energy. While flexibility in an athletes diet is encouraged, avoid making processed food or foods high in sugars and unhealthy fats a primary nutrition source.
2. Inadequate sleep – For most athletes, 6 – 8 hours is the recommended amount of sleep. For those athletes whose activities outside of training are also labour intensive, a short nap or enforced rest period may be necessary. Where possible, avoid disruptive sleeping patterns and try to maintain a consistent schedule.
3. Stress – A factor sometimes outside of our control, minimising stress in our lives plays a big part in fatigue management. Typical sources of stress include work, relationships, or financial issues.
4. Overtraining – Inappropriately constructed training programs will sometimes lead to overtraining, burning an athlete out. Too much volume, repeated high intensity sessions with inappropriate rest, or prolonged training cycles with no de-load are all typical causes of overtraining.
While most of the above is common sense, many athletes believe they are immune to fatigue, or refuse to acknowledge the warning signs. If you’ve noticed a decrease in performance, or any other indicators of fatigue, it might be time to stop and evaluate your current situation – don’t let fatigue have an impact on your performance!
Little bit of triples at 160kg for Lyle from last night. Gradually building that strength!
Here’s our Rugby Union Athlete Jake doing some “conditioning”. We can see him performing a belt squat loaded with a barbell.
Jake loves a bit of banter when he trains, but when it comes to the crunch, he’s 100% focused. Watch this space, he’s already a beast but he gets stronger everyday!
If you’d like to know the purpose behind the exercise, feel free to send us a Facebook message!
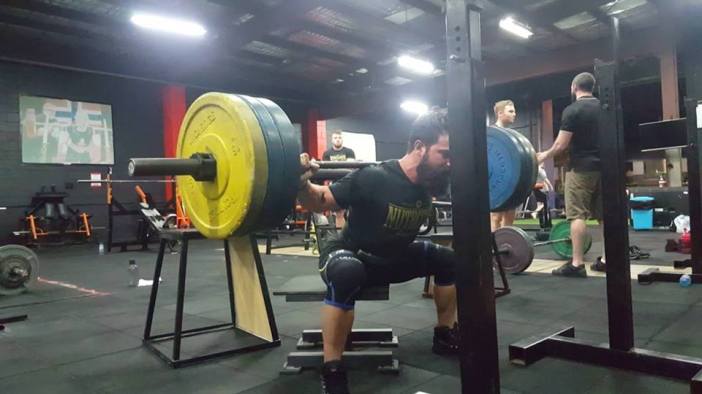
Here’s our athlete Alicia crushing a 120kg Box Squat. She’s developing a low bar squat pattern to assist her posterior chain strength whilst trying to minimise “sliding into her quads”. She’s one of the hardest workers in the gym, who’s always chasing progress.
P.S. What a numpty spotter?
Got to spend sometime with distance athlete Germaine Paulson yesterday helping him get ready for footy (ex nrl player) this season his focus as with all our guys is the posterior chain development
Here we are doing banded good mornings adding a diagonal band to really light up that P.C.
Sets of 20 does the trick!
Don’t forget we have memberships now!
🎓 📝 LAB REPORT-365 📝 🎓
#47 Squatting WITH ANKLE ROM ISSUES
